Introduction:
In-app notifications are a powerful way to engage users directly within your model-driven Power Apps. These notifications appear in the notification center (bell icon) in the app header. Here’s how to set them up and send them using Power Automate.

Enabling In-App Notifications in Model-Driven Apps
Before you can send notifications, you need to ensure the feature is enabled.
How to Enable:
- Go to Power Apps and open your model-driven app in the App Designer.
- Select the Settings gear icon in the top right.
- Navigate to:
Settings > Features > In-App Notifications - Turn on the toggle for In-App Notifications.
- Save and publish your app.
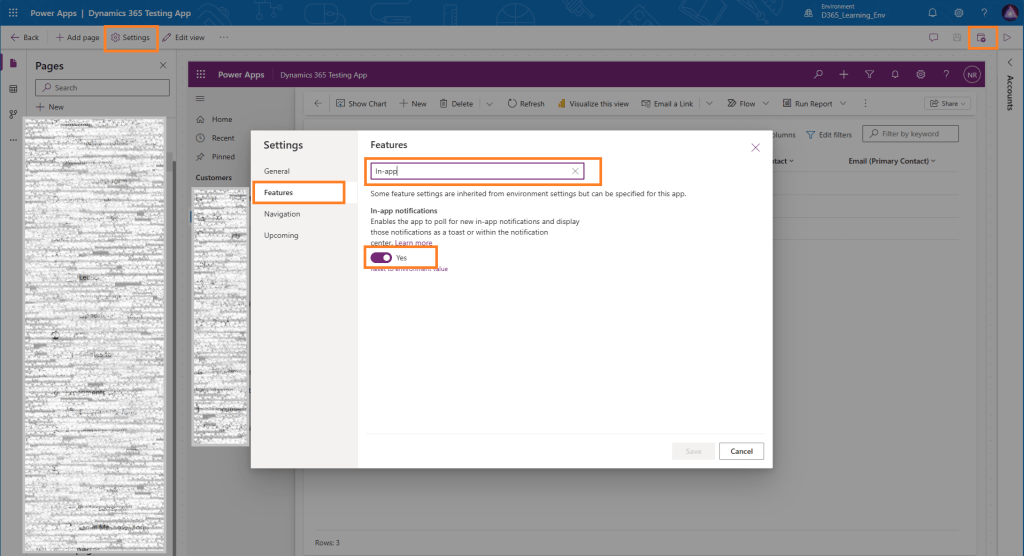
You should now see a bell icon 🔔 in the top navigation bar when you run the app — this is the notification center.
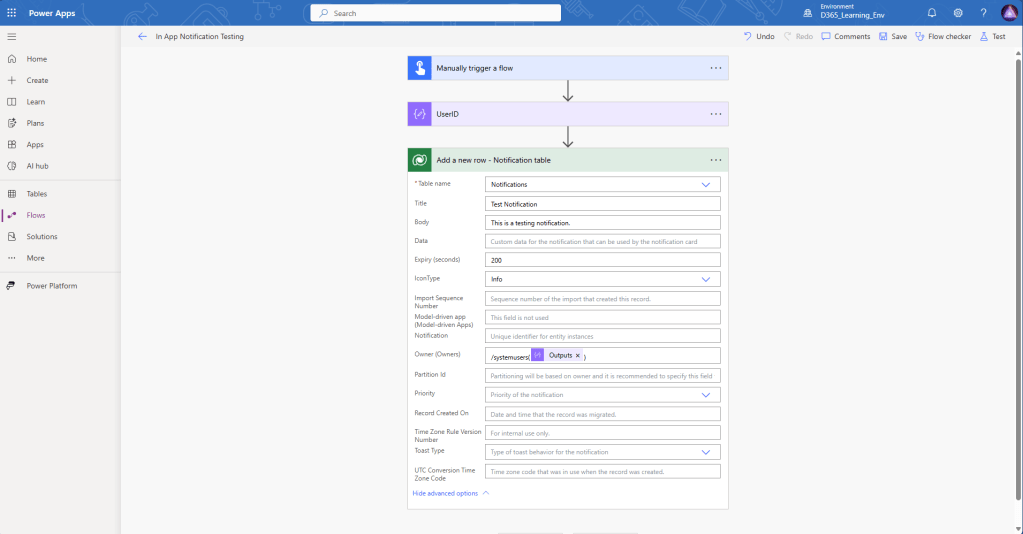
Build the Power Automate Flow to Send a Notification
Let’s create a simple flow that sends a notification using a manual trigger — perfect for testing and understanding the mechanism.
Flow Overview:
- Trigger: Manual (for testing purposes)
- Action 1: Compose (User ID of the recipient)
- Action 2: Add a new row to the
Notificationtable
Detailed Steps:
- Create a new cloud flow in Power Automate.
- Trigger: Use the “Manual trigger a flow”.
- Action – Compose (User ID):
- Add a Compose step.
- In the Inputs field, enter the User ID (GUID) of the target user.
- You can retrieve this from the
System Userstable in Dataverse.
- You can retrieve this from the
- Example: 12a34567-b89c-1234-d567-890e123f4567
- Action – Add a new row (Dataverse):
- Use the “Add a new row” action.
- Choose the “Notification” table.
- Fill out the fields:
- Title: Your notification title.
- Body: Notification message (can be plain text).
- Owner (Users): Use the output from the Compose step.
- Priority: Normal / High.
- Toast Type: Timed / Hidden.
- Icon Type (optional): Info, Warning, Error.
- Expiry (seconds): Expiry time for notification
- Data: Optional JSON with additional data
- Save and Test the flow.
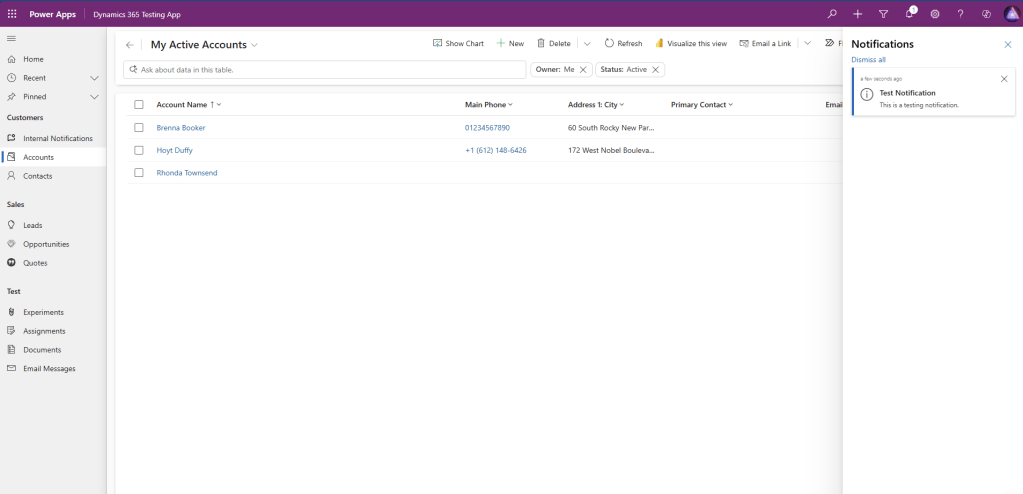
Result – Viewing the Notification
Once the flow runs successfully:
- Open your model-driven app.
- Click on the bell icon 🔔 in the top right.
- You should see your custom notification displayed in the panel.
Conclusion
Sending in-app notifications in a model-driven app is a great way to enhance user engagement and ensure critical information is delivered at the right time. With Power Automate and a few simple steps, you can start sending personalized, contextual alerts directly inside your app.
Whether it’s reminders, updates, or warnings — this method helps keep users informed without leaving the app.
Keep Learning!
- Share your thoughts or questions in the comments below.
- Stay tuned to our blog for more Dynamics 365 tips and tutorials.
Thanks for reading!

Leave a comment