
Dynamics 365 is a dynamic platform, and sometimes, its true potential is unlocked when we can react intelligently to the changes happening within our data. This is where the magic of plugins comes in. Think of them as your custom-built sentinels, constantly monitoring your CRM and ready to spring into action when specific events occur.
At their core, Dynamics 365 plugins are snippets of .NET code (typically crafted in C#) that you can register to execute in response to a wide array of system events. They empower you to go beyond the out-of-the-box functionality, allowing you to weave in your unique business rules, automate intricate processes, and seamlessly integrate with other vital systems. From enforcing data quality to orchestrating complex workflows, plugins are the key to tailoring Dynamics 365 to your precise needs.
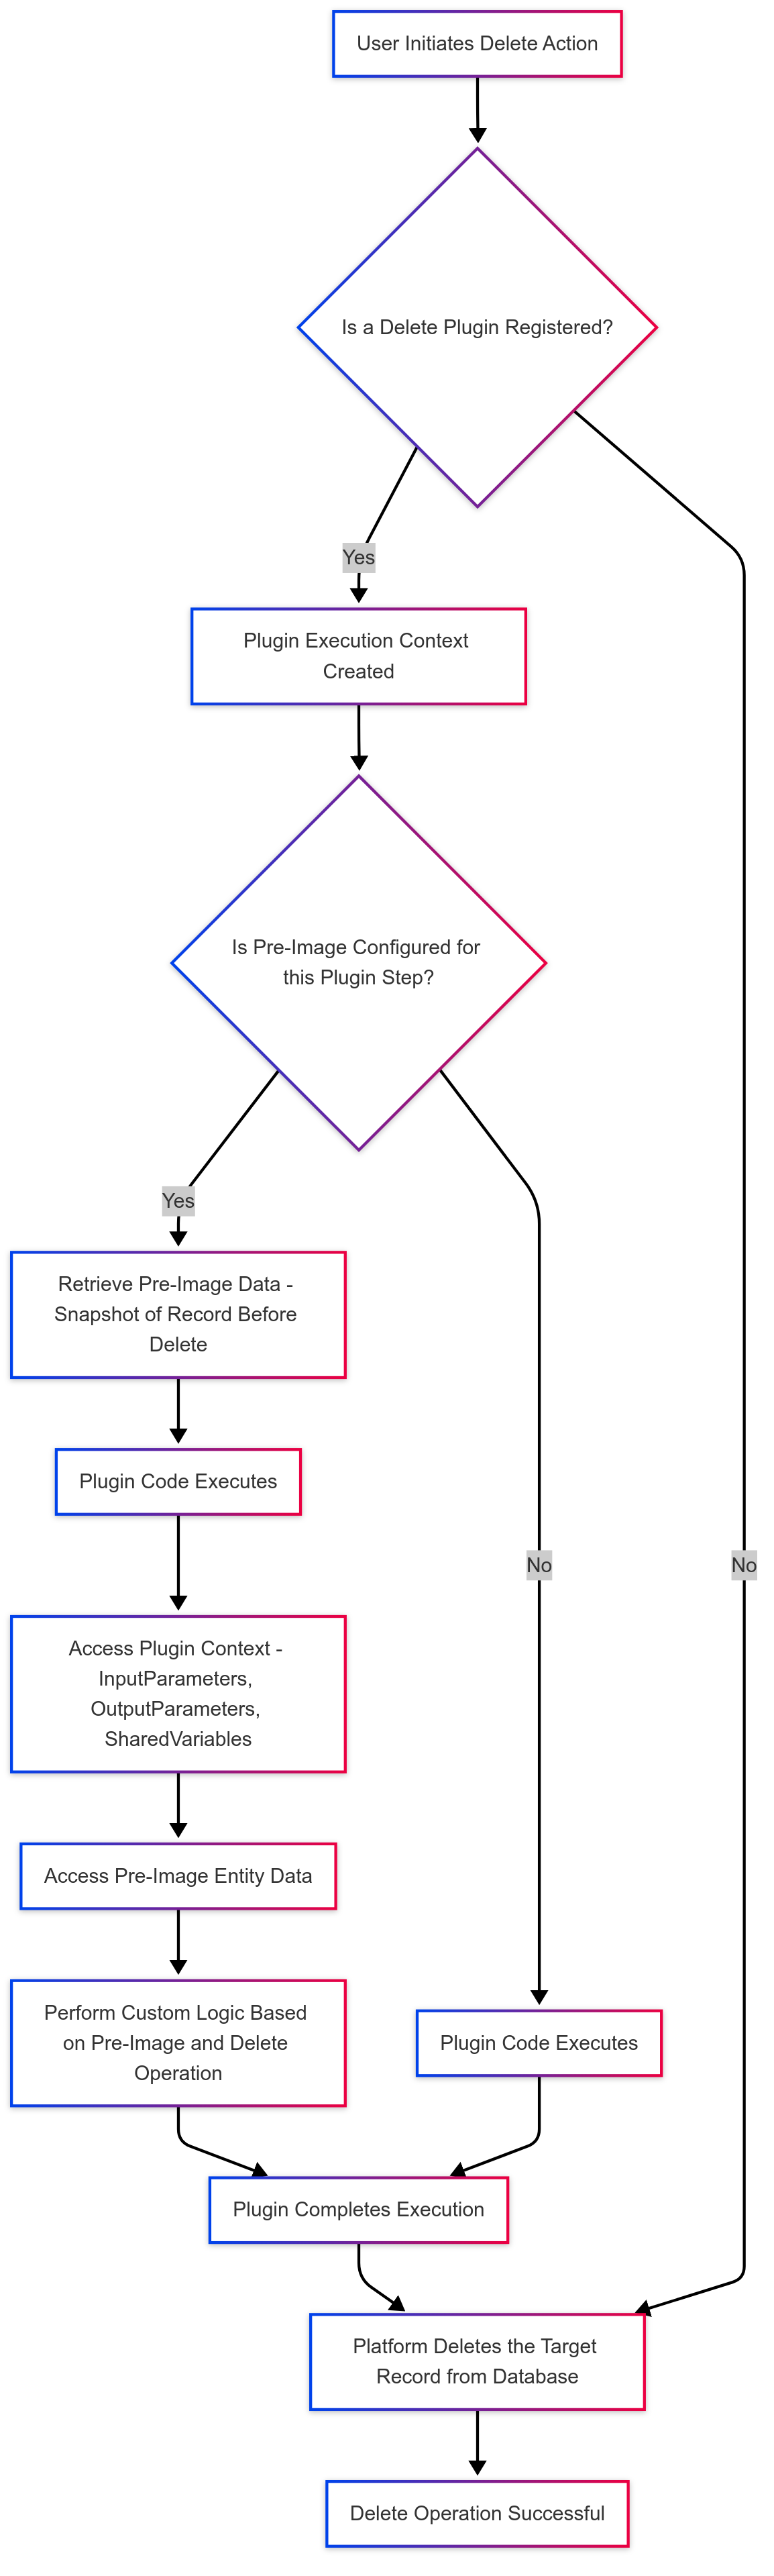
While plugins often react to creation or updates, they are equally crucial when records are deleted. Imagine scenarios where you need to audit deletions, trigger related clean-up tasks, or even archive data before it’s permanently removed. This is where delete plugins come into play, allowing you to execute custom logic precisely when a record is about to be erased.
Now, when a record is being deleted, you might wonder: how can I access the data that is about to be lost? This is where the concept of the pre-image becomes indispensable for delete operations. A pre-image, in the context of a delete plugin, provides a snapshot of the record’s attributes immediately before it is deleted. This invaluable capability unlocks critical use cases, such as:
- Auditing Deleted Records: Capturing key information about the record before it’s gone for compliance or analysis.
- Triggering Related Actions: Ensuring that related records or processes are handled appropriately when a primary record is deleted (e.g., canceling associated appointments).
- Data Archival: Moving the data to a separate archive before the permanent deletion occurs.
In this blog post, we will delve into the world of Dynamics 365 delete plugins and, more importantly, explore how to effectively configure and utilize the pre-image. We’ll demonstrate how accessing the “before” state of a deleted record empowers you to build more robust, auditable, and data-aware solutions within your Dynamics 365 environment. Let’s unlock the power of understanding data context even in the face of deletion!
Prerequisites:
If you are new to PlugIn development, please first read this blog: Building Your First Dynamics 365 Plugin: From Setup to Deployment – Dynamics Services Group
Step-by-Step Plugin Development
Creating the Plugin Project:
- Open Visual Studio (2019 or 2022).
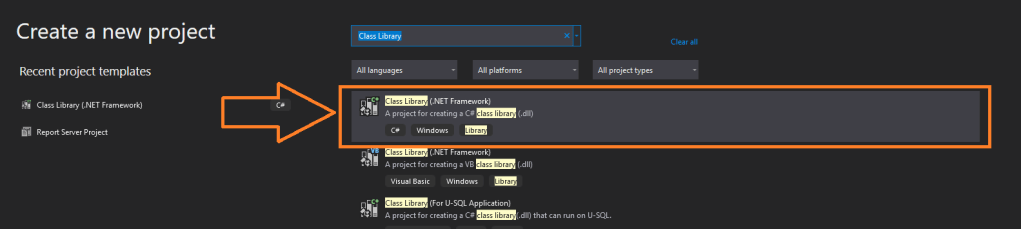
- Go to File > New > Project. (Or Click “Create a new Project” as shown below)
- Select Class Library (.NET Framework) (see below image (2nd)).
- Click Next, then:
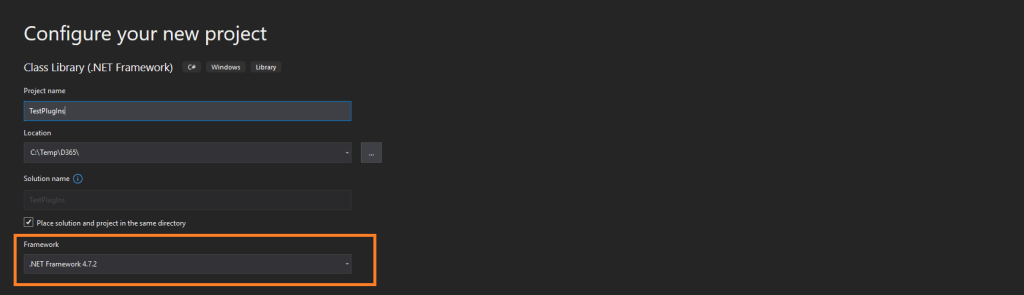
- Project Name: e.g.,
AccountPlugin - Location: Choose a directory
- Framework: Select .NET Framework 4.7.2 (or 4.6.2 / 4.8 if needed) (See below image 3rd)
- Project Name: e.g.,
- Click Create.

Adding Required NuGet Packages:
Go to Tools -> NuGet Package Manager -> Manage NuGet Package for Solution…

Browse crm and you will find “Microsoft.CrmSdk.CoreAssemblies”, which contains core CRM SDK classes like IPlugin, IServiceProvider, IOrganizationService, etc., install it.

Additional packages are available for installation based on your specific requirements. However, they are not necessary for the current project and are listed below for your information.
- Microsoft.CrmSdk.Workflow – Only needed if you’re developing workflow activities
- Microsoft.CrmSdk.XrmTooling.CoreAssembly – Useful for console apps/tools connecting to CRM
- Newtonsoft.Json – For handling JSON (e.g., when calling external APIs)
- Polly – Retry logic when calling APIs
- Microsoft.Extensions.Logging – Structured logging support (if you’re doing advanced plugin diagnostics)
Sample Plugin Class Skeleton
using Microsoft.Xrm.Sdk;
using System;

public class AccountCreatePlugin : IPlugin
{
    public void Execute(IServiceProvider serviceProvider)
    {
        IPluginExecutionContext context =
            (IPluginExecutionContext)serviceProvider.GetService(typeof(IPluginExecutionContext));

        IOrganizationServiceFactory serviceFactory =
            (IOrganizationServiceFactory)serviceProvider.GetService(typeof(IOrganizationServiceFactory));

        IOrganizationService service = serviceFactory.CreateOrganizationService(context.UserId);

        Entity target = (Entity)context.InputParameters["Target"];

        if (target.LogicalName == "account")
        {
            // Your logic here
        }
    }
}
Best Practices:
Error Handling
- Always wrap your logic in try-catch blocks
- Use
InvalidPluginExecutionExceptionto raise errors back to CRM - Log everything to
ITracingService
try
{
    // Your plugin logic here
}
catch (Exception ex)
{
    tracingService.Trace("SamplePlugin: {0}", ex.ToString());
    throw new InvalidPluginExecutionException("An error occurred in SamplePlugin.", ex);
}
Logging
Use ITracingService.Trace() generously — especially during development or debugging.
tracingService.Trace("Plugin triggered for entity: {0}", context.PrimaryEntityName);Logs are viewable in Advance Settings -> Customizations -> Plug-In Trace Log in Dynamics 365 if enabled.
Example Delete Plugin with Pre-Image Scenarios
Let’s first explore some real-world examples, we will configure the pre-imaeg for the plugin later in the blog (in Deployment to Dynamics 365 (PlugIn + Step + Pre-Image)).
Example 1: Let’s implement a plugin that logs information about deleted accounts to a custom audit entity.
using Microsoft.Xrm.Sdk;
using System;

public class AuditDeletePlugin : IPlugin
{
    public void Execute(IServiceProvider serviceProvider)
    {
        // Obtain the execution context
        IPluginExecutionContext context = (IPluginExecutionContext)serviceProvider.GetService(typeof(IPluginExecutionContext));

        // Verify this is running on account deletion
        if (context.MessageName.ToLower() != "delete") return;
        if (context.PrimaryEntityName.ToLower() != "account") return;

        // Get the target reference (the record being deleted)
        EntityReference targetRef = (EntityReference)context.InputParameters["Target"];

        try
        {
            // Access the pre-image
            if (!context.PreEntityImages.Contains("PreImage"))
                throw new InvalidPluginExecutionException("Pre-image not configured correctly!");

            Entity preImage = context.PreEntityImages["PreImage"];

            // Create service factory
            IOrganizationServiceFactory serviceFactory = (IOrganizationServiceFactory)serviceProvider.GetService(typeof(IOrganizationServiceFactory));
            IOrganizationService service = serviceFactory.CreateOrganizationService(context.UserId);

            // Create audit record
            Entity auditLog = new Entity("new_auditlog");
            auditLog["new_name"] = $"Account deletion: {preImage["name"]}";
            auditLog["new_recordid"] = targetRef.Id.ToString();
            auditLog["new_recordtype"] = "Account";
            auditLog["new_action"] = "Delete";

            // Copy important fields from pre-image
            if (preImage.Contains("emailaddress1"))
                auditLog["new_email"] = preImage["emailaddress1"];

            if (preImage.Contains("telephone1"))
                auditLog["new_phone"] = preImage["telephone1"];

            // Save the audit record
            service.Create(auditLog);
        }
        catch (Exception ex)
        {
            throw new InvalidPluginExecutionException($"Error in delete plugin: {ex.Message}");
        }
    }
}
Example 2: Prevent Deletion with Conditions (Account with Open Opportunities)
public class PreventAccountDeletionPlugin : IPlugin
{
    public void Execute(IServiceProvider serviceProvider)
    {
        IPluginExecutionContext context = (IPluginExecutionContext)serviceProvider.GetService(typeof(IPluginExecutionContext));

        if (context.MessageName.ToLower() != "delete") return;
        if (context.PrimaryEntityName.ToLower() != "account") return;

        // Get service for queries
        IOrganizationServiceFactory serviceFactory = (IOrganizationServiceFactory)serviceProvider.GetService(typeof(IOrganizationServiceFactory));
        IOrganizationService service = serviceFactory.CreateOrganizationService(context.UserId);

        // Get the account being deleted from pre-image
        Entity preImage = context.PreEntityImages["PreImage"];
        Guid accountId = preImage.Id;

        // Query for related open opportunities
        QueryExpression query = new QueryExpression("opportunity");
        query.ColumnSet.AddColumn("name");
        query.Criteria.AddCondition("parentaccountid", ConditionOperator.Equal, accountId);
        query.Criteria.AddCondition("statecode", ConditionOperator.Equal, 0); // Active

        EntityCollection results = service.RetrieveMultiple(query);

        if (results.Entities.Count > 0)
        {
            throw new InvalidPluginExecutionException(
                "Cannot delete account with open opportunities. Close or reassign opportunities first.");
        }
    }
}
Signing the Assembly
Why Signing Is Important
- Dynamics 365 Online requires all plugins to be strong-named.
- A strong-named assembly has a unique identity (name + version + culture + public key).
- It prevents conflicts, allows for assembly versioning, and ensures security & trust.
- Without signing, registration of the plugin will fail in Dynamics 365 online environments.
How to ?
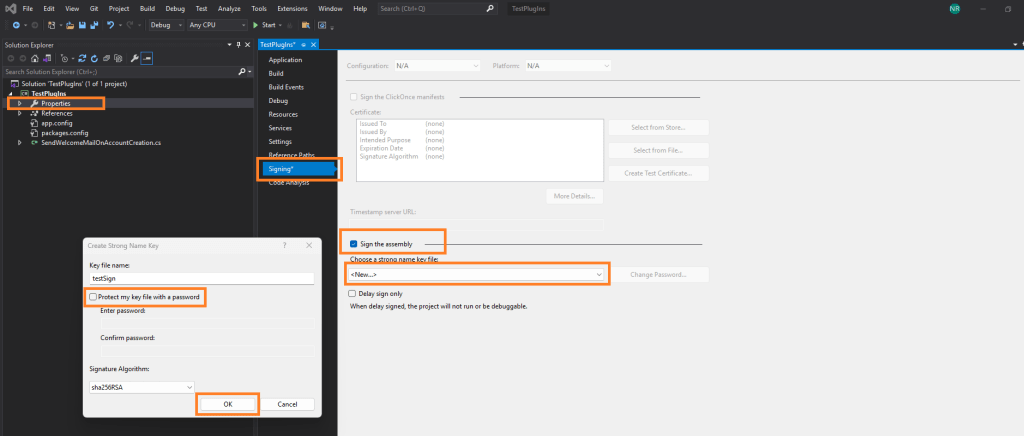
- Right-click your plugin project > Properties.
- Go to the Signing tab.
- Check “Sign the assembly”.
- From the dropdown, choose:
- <New…> to create a new strong name key.
- Name it something like
PluginKey.snk. - You can leave the password field blank for simplicity (or protect it if needed).
- Save and rebuild.
Building the Solution


Output Location
After a successful build:
- Go to your project’s
bin\Releasefolder. (or bin\debug if build is set to debug in VS) - You’ll find:
YourPlugin.dll- Possibly
.pdb(symbols file — not needed unless debugging with Plugin Profiler) - Any other dependency DLLs if applicable

Deployment to Dynamics 365 (PlugIn + Step + Pre-Image)
Using Plugin Registration Tool
The Plugin Registration Tool (PRT) is a powerful utility in the Dynamics 365 SDK that allows you to register, update, and manage custom plugins and custom workflow activities. Below is a detailed walkthrough covering:
- Registering Assemblies
- Registering Plugin Steps and Images
- Using Secure Configurations
- Updating Existing Plugins
Make sure you’ve downloaded the latest Plugin Registration Tool. (see Prerequisites)
Now launch the Plugin Registration Tool:
First Connect: using email and password

Now let’s register the plugin. Register -> Register New Assembly


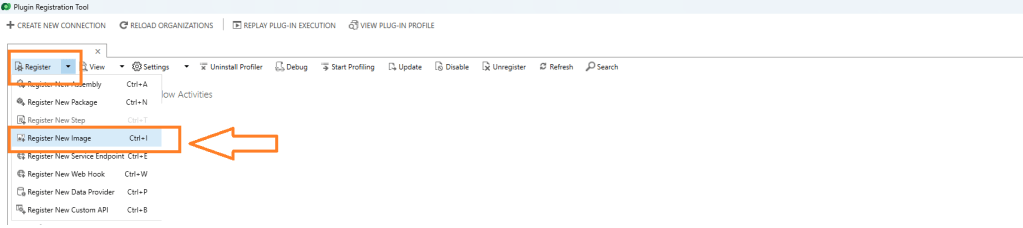
Now Let’s add Step for the plugin. (A step is is trigger point, like on Create, on Delete, etc.)


Once you’ve added your plugin step, your plugin is officially registered and ready to go! Now Let’s add the

Always remember, which name you give here, will be used in the code.
 // Get the account being deleted from pre-image
 Entity preImage = context.PreEntityImages["PreImage"];
After this your plugin is live.
Now it’s time to test and debug your plugin:
- Try performing the action in the system (like creating or updating a record) that should trigger your plugin.
- Check if the expected behavior occurs.
- If something doesn’t work as expected, double-check:
- The assembly and step registration details
- The plugin logic itself
- Any error messages in the Plugin Trace Logs (if enabled)
Tip: You can enable plugin trace logging in System Settings > Customization > Plug-in Trace Log, which is super helpful for debugging.
Once you confirm your plugin is working as intended, you’re all set to continue building more logic or deploying to other environments.
Key Considerations for Delete Plugins
- Execution Stage:
- Use Pre-operation if you might prevent the deletion
- Use Post-operation if you just need to react after deletion
- Pre-Image Configuration:
- Must be registered with the correct name that matches your code
- Only includes attributes you explicitly select (Parameters == Columns)
- Performance:
- Keep pre-image attributes to only what you need
- Avoid complex logic in delete plugins as they block the deletion operation
Thank you for following along on this journey into Dynamics 365 plugin development. We hope this guide has empowered you to create more intelligent and responsive CRM customizations.
Keep Learning!
- Share your thoughts or questions in the comments below.
- Stay tuned to our blog for more Dynamics 365 tips and tutorials.
Thanks for reading!

Leave a comment